Monday, March 22, 2010

everyone's favorite - choc chip cookies!

it's been a while since a new recipe came up on this blog. i suddenly felt like baking recently, so decided to make everyone's all-time favorite : choc chip cookies!

ingredients
125g unsalted butter
1/2 cup sugar
1/2 cup brown sugar
1/2 tsp vanilla
1 egg
1 cup self-raising flour
3/4 cup plain flour
1/2 tsp salt
125g of choc chips (this one i just added as much as i wanted!)
optional : 60g slivered almonds (or walnuts)


1. Preheat oven at 180deg Celcius.
2. Cream butter, sugars and vanilla.
3. Add the egg and beat well.
4. Mix in sifted flour and salt.
5. Add choc chips (and nuts), mix well. Steps 2-4 were done with my trusty kitchenaid mixer.. after which i took a spatula and mixed in the choc chips by hand. I didn't want the mixer to crush the chocolate chips!

5. Shape teaspoonfuls of batter into small balls. I was greedy this time round. I wanted subway sized cookies, hence I just plopped large balls of dough onto the tray. The cookies are HUGE! Should've followed the instructions, coz once the cookies were done, they definitely would be more enjoyable if you'd pop them into your mouth, one by one.

6. Bake for 10-12 mins.

Ta da!

Saturday, September 6, 2008

Green Tea Macaron

After being obsessed with macarons since visiting Wittamer in Belgium. Months have passed and in my time of imprisonment, I have decided to attempt to make macarons. Trawling the net for recipes and making do with what I can find in the local supermarket, I present my first macarons!

Green Tea Batter (improvised with help from David Lebovitz's Chocolate Macaron Recipe)
1 cup (100 gr) powdered sugar/icing sugar (make sure no starch involved)
½ cup powdered almonds (about 2 ounces , 50 gr, sliced almonds, pulverized)
3 tablespoons (25 gr) matcha powder instead of cocoa
2 large egg whites, at room temperature
5 tablespoons (65 gr) granulated sugar

As David Lebovitz puts it;
Preheat oven to 375 degrees F (180 degrees C).Line two baking sheets with parchment paper and have a pastry bag with a plain tip (about 1/2-inch, 2 cm) ready.

Grind together the powdered sugar with the almond powder and cocoa so there are no lumps; use a blender or food processor since almond meal that you buy isn't quite fine enough.

In the bowl of a standing electric mixer, beat the egg whites until they begin to rise and hold their shape. While whipping, beat in the granulated sugar until very stiff and firm, about 2 minutes.

Carefully fold the dry ingredients, in two batches, into the beaten egg whites with a flexible rubber spatula. When the mixture is just smooth and there are no streaks of egg white, stop folding and scrape the batter into the pastry bag (standing the bag in a tall glass helps if you're alone).

Pipe the batter on the parchment-lined baking sheets in 1-inch (3 cm) circles (about 1 tablespoon each of batter), evenly spaced one-inch (3 cm) apart.

Rap the baking sheet a few times firmly on the countertop to flatten the macarons, then bake them for 15-18 minutes. Let cool completely then remove from baking sheet.

Follow this man's instruction to the T, I became tired and didn't tap the last batch, they came out all cracked...

testing my piping skills (non existent)
so happy when they all came out with 'feet' (the ruffle-y bottoms)


Filing (white chocolate ganache-ish thing)
1/2 cup heavy cream
7 ounces white chocolate

melt chocolate in bain marie (complicated for glass bowl over boiling water)
mix in cream
whisk and let sit in fridge
take out and beat it to death with an electric whisk
re-refrigerate

Spoon the filling onto the macaron halves. There are some guesswork involved to find the right halves for each other. Pretend you are matchmaking.

stick together and eat!

They were much too sweet for my taste, I would halve the sugar.
Luckily we had fresh blueberries at home, i placed some in between and they are a good contrast to the sweetness.

Enjoy!

Wednesday, August 20, 2008

Kopi Cafe


My second latte art attempt. Why can't I frothe my milk as creamy and smooth as the latte at The Adore??? Check out this lovely Japanese French Cafe that I just discovered at Union Square, on 13th and University Place. Yums!


Saturday, June 21, 2008

Copy Kopi


wohooho.. failed.. i am to be better...

Saturday, June 14, 2008

Friday, March 21, 2008

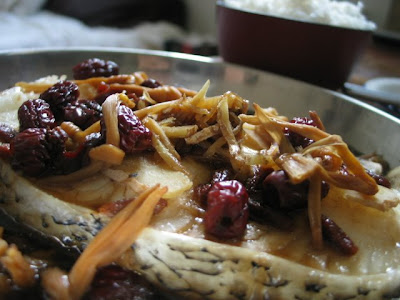
steam fish


+ cod fish for its fat content(or grouper or fish of similar texture)
+ red dates
+ "gei-chi"- the red small thingy that is good for your eyes
+ mushrooms of any kind, fresh or dried
+ lotsa ginger
+ oyster sauce
+ a bit of soy sauce, sesame oil and salt

1. sprinkle salt on the fish
2. in a deep plate, arrange the rest of the ingredients nicely around/on top/under(ginger)the fish
3. boil water in a pot big enough to contain the plate, steam fish over boiling waterfor abt 15-20 mins

Wednesday, March 19, 2008

gyoza!


+ minced meat
+ cabbage or chinese chives or whatever veg you can find in your fridge.
+ garlic
+ onion
+ soya sauce
+ sesame oil
+ pepper
+ gyoza skin [ it was a bit of a failure the last time when m and i made the skin from scratch. we had rather deformed gyozas... buy the premade ones. easier to handle! less hassle too!]
+ ginger
+ vinegar

1) chop up cabbage and onion. mince the garlic as well.
2) add to minced meat.
3) add soya sauce, sesame oil, salt and pepper.
4) wrap gyoza.
it is a little hard to explain how to wrap. but basically:
4a) lay the gyoza skin on the palm of your hand.
4b) place a tablespoon of meat mixture.
4c) moisten the edges of the gyoza skin.
4d') fold into half and squeeze if you dun want to bother with the pleats.
4d'') if you want to challenge the dexterity of your hands, then erm. it is a slightly cheem folding process if you have never done it before. i learnt how to do it from a youtube video so go look it up! pleat only one side and press down as you go along. so basically you are folding the skin onto itself then pressing it down onto the other side of the gyoza hence by each fold, you are sealing the little gyoza parcel. the ridge will then form a slight crescent shape. so this means the pleats only appear on one side the other side of the gyoza is flat. if you pleat when you have already stuck the edges together thus causing both sides to have pleats, it kindof looks more like a curry puff.
erps. not very clear and not the best instructions... argh..i think watch on youtube and learn from there... will be 7834x more useful. hahaha...
5) repeat repeat repeat like a broken record until you either finish all your meat mixture or your gyoza skins. whenever one of the ingredients run out. after that's done, place in fridge for it to harden slightly otherwise a bit tough to handle it in
nuah form.
6a) either place in steamer and steam,
duh or
6b) pan fry it first with some oil then when bottoms are brown, add water and cover pan for a few minutes for the gyoza to cook.
7) serve with ginger sliced into thin strips and vinegar, or with ra-yu, the japanese chilli oil, or soya sauce... up to you....

oh yes. you can boil it too.. such versatility leh! heh.